In my pursuit to heal my body I have tried and tested many different holistic healing therapies. One therapy that I found particularly beneficial was T.R.E (Trauma release exercises). I found an incredibly helpful practitioner online by the name of Raymond Lambert who can be found on www.treireland.ie.
What is TRE
TRE® (Tension, Stress & Trauma Release Exercise) is an innovative series of exercises that assist the body in releasing deep muscular patterns of stress, tension and trauma. Created by Dr. David Berceli, TRE safely activates a natural reflex mechanism of shaking or vibrating that releases muscular tension, calming down the nervous system. When this muscular shaking/vibrating mechanism is activated in a safe and controlled environment, the body is encouraged to return back to a state of balance.
Where we hold our traumas
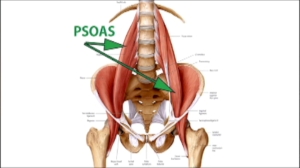
We all store traumas in our bodies that have been too difficult to process in our mind so we lock them away inside. These physical and emotional traumas tend to be trapped away in our psoas muscle.
The psoas is a rope-like muscle located deep in the belly, which runs obliquely from spine to the femur. The psoas is joined at the hip by the iliacus which travels from hip to thigh. Together the psoas and iliacus make up the iliopsoas, the body’s most powerful hip flexor.
The Psoas/”fight or flight” muscle
This muscle has become known as the ‘fight or flight muscle’ because of how it is deeply effected by emotions. These such emotions can cause very problematic outcomes. When the body is under chronic stress, anxiety or trauma the psoas muscle contracts. It’s immediate reaction is to pull in, shorten, tighten, all because of the very primal and basic instinct to protect. This reaction can cause anything from hip, leg, shoulder, neck and back pain.
Let’s shake it baby
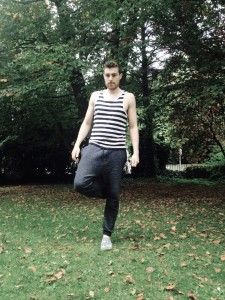
With the above in mind let’s get shaking to release the traumas we are holding in our bodies. This is an incredibly relaxing exercise and you only need around ten minutes to do it. Here are the exercises that you do in order to get the psoas to relax and let go:
The above is the first exercise and it is to be repeated on both sides. Your weight should be distributed on to the outside of the standing foot. Alternate each leg-stand 10 times (5 times on each leg), holding the pose for 3 cycles of breath (one cycle of breath is one full inhale and exhale).
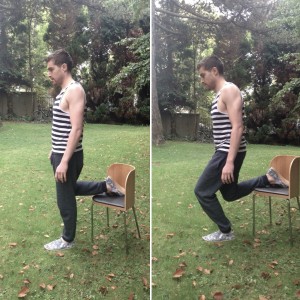
2. Grab a chair
For the next exercise you need to grab a chair and set one foot on the chair like in the photo on the left above. From a straight leg position you bend into the standing leg without letting the knee go past your toes. Come back up to the standing position and repeat this exercise ten times on each leg.
3. Side lunge
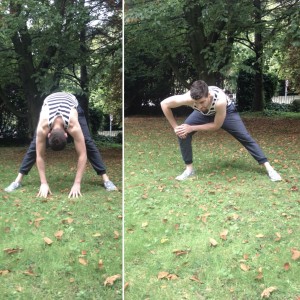
The third exercise involves a wide legged forward bend and a lunge to each side. With your legs as wide as is comfortable, bend over from your hips and reach for the ground, as in the picture on the left. Allow your knees to bend as much as is necessary so that you are not in pain. Hold this position for 3 cycles of breath.
Then lunge to one side, holding the side lunge as in the picture on the right above for 3 cycles of breath. Then move to the other side and repeat the same.
4. Lean Back
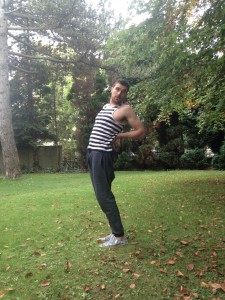
At this point your body may begin to shake. This means the exercises are working so don’t worry. The fourth exercise above involves placing your hands just above your hips, on each side of your lower back. From this position you turn to one side and lean back, pushing your hands into your back to get a better stretch. Move from side to side slowly and repeat the exercise five times on each side. Make sure to hold the fully turned position each time for two cycles of breath.
5. Wall sits
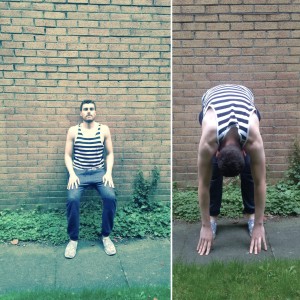
This exercise will 100% make your psoas muscle shake. Find a wall and sit into it like in the picture on the left above with your back straight. You can sit as low as is comfortable. Try to hold this position for 3 to 5 minutes. Start with 3 minutes as it will be extremely difficult at first to hold this position.
Once you are all done with the wall, come into a forward bend and bend the knees as much as is needed in order to touch the ground. Hold this position for 5 cycles of breath.
6. Get grounded
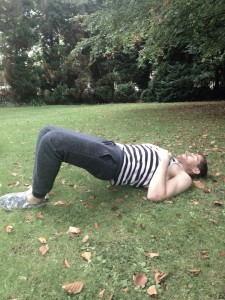
This next exercise is similar to a bridge pose but your two feet are together with the soles touching each other. So you are lying on your back and pushing your hips up in the air whilst at the same time letting the legs open away from each other. You can hold this position for 30 seconds before moving on to the final exercise.
7. Shake what your Mamma gave you
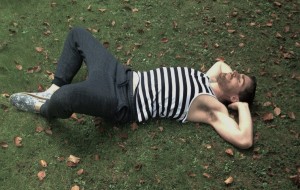
This final exercise will really get you shaking. Lying on your back, put the soles of your feet together and slowly let your knees fall away from each other. Place both palms open under each side of your head and let your head rest in your hands. If your shoulders are stiff don’t worry if your elbows are off the ground.
Once your hips are open to your full capacity, start to gradually (very slowly) draw your knees together until the shaking begins. As the body starts to shake, don’t try and fight it or stop it, just allow the body to let go of what it is holding on to. Another thing which may happen at first is you may not shake at all, this is not because you are doing it wrong. Everybody is different and you may not be holding a lot of tension or some days your body doesn’t feel like letting go so don’t worry if nothing happens.
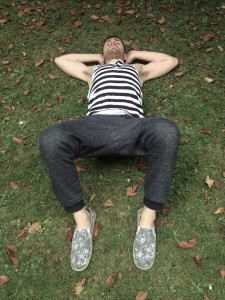
You can hold this position for as long as you want. Best to hold for at least a minute to see what happens. If you start shaking a lot you can stay with it for as long as you feel comfortable before finally coming up to the following position to finish off the exercise:
If you are still shaking at this point that is perfectly fine. Just try to relax into it and when you are ready you can come out of the exercise and go about your day with a little less trauma :).
Thank you so much for reading.
Happy, determined, positive and focused healing to you all.
Follow me for more regular updates on;
Facebook (https://facebook.com/assmovement)
Instagram (https://instagram.com/theassmovement)
