At the core of Flow yoga classes is vinyasa – which you’ve probably heard your yoga teacher mention more than a few times. If you’ve never had the phrase explained to you, it can be a little confusing! But no worries, we’re here to clear it up for you 🙂
But what exactly does it mean to ‘take a vinyasa’?
Very literally, vinyasa means: to place in a special way. In a vinyasa based flow class, that means linking movement with breath and moving with intention.
When your yoga teacher mentions taking a vinyasa , they’re referring specifically to the transition from Chaturanga or Knees Chest Chin through Upward Facing Dog or Cobra, back into Downward Facing Dog.
Why do we vinyasa?
We usually take a vinyasa after we’ve finished doing a particular sequence on one side of the body, before doing the same on the other side. It allows you to clear the slate and come back into balance before changing sides, and helps us to burn through any extra energy we might have on a particular day.
How to take a vinyasa.
There are two different ways to move through a vinyasa.
This first variation is perfect if you’re newer to yoga, still working on building strength, early on in practice when you’re still warming up, or if you’re feeling a bit tired.
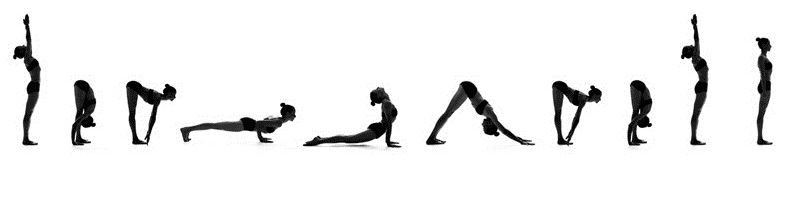
Vinyasa Option 1
- Plank – Inhale to come into Plank Pose, wrists under shoulders and feet hip-width apart.
2. Knees-Chest-Chin – Exhale to drop your knees to the mat, shift your weight forward, wrap elbows in to ribs, then keep hips high as you lower chest and chin to the mat. Slide your feet out behind you.
3. Cobra – Inhale to draw your chest forward, keeping your gaze down. Draw shoulders back and down, keeping your low ribs on the mat and ground down into the feet.
4. Downward Facing Dog – Exhale to come back to hands and knees and lift your hips back up and high into Downward dog.
As you begin to advance in your practice, when you’re warmed up, and when you’re feeling energised and strong, you can start to advance your vinyasa a bit, working through:
Vinyasa Option 2
1. Plank – Inhale into plank.
2. Chaturanga Dandasana – From plank, exhale to shift upper body forward, wrap elbows into ribs, and lower the body half way to the mat, pausing when shoulders and elbows are in line. If you’re starting to collapse, just keep working with Knees-Chest-Chin as outlined above.
3. Upward-Facing Dog – Inhale to pull your chest forward, lengthen the spine and straighten the arms. Knees and hips stay off the mat here. Keep your elbows drawn in, press through the tops of your feet, keep your shoulders down away from your ears, and open your chest.
4. Downward-Facing Dog – Exhale to roll over the toes and lift the hips up and back into Downward Dog.
Chaturanga is a seriously underrated pose that requires a LOT of strength to do correctly. And we do it so often that repeatedly doing it incorrectly puts us at risk of injury – so please stick with Knees-Chest-Chin as you build strength. Don’t let your ego talk you out of it! We have a future blog post coming all about working on correct alignment in Chaturanga if it is something you’re working on 🙂

And remember that it’s ALWAYS okay to skip a vinyasa entirely if your breath is getting forced or you’re feeling tired – just go straight to Downward Dog or Child’s Pose – again, tell that ego where to go if it argues with you on that one.
Happy vinyasa-ing!